Blog
-
![img]() Microsoft Shifts Focus with Selective Xbox Exclusives While... This article examines recent developments in Microsoft's approach to game exclusivity on the Xbox platform, focusing on an emerging emphasis on single-player experiences while maintaining cross-platform support for multiplayer features.
Microsoft’s strategy of supporting multiple platforms is still evolving. For instance, Forza Horizon 6 remains accessible Available on personal computers as well as on the Xbox Series S/X despite plans that had been discussed earlier. Recently, during an Xbox Games Showcase, announcements confirmed that certain upcoming titles, For example, titles like Gears of War: E-Day and Clockwork Revolution would be available solely on Xbox. These titles are intended to remain exclusive without any temporary limitations.
This decision has ignited conversations about what lies ahead number of exclusive titles on the Xbox. While the exact count of exclusive games has not yet been detailed, indications show that more titles will follow. Key points emerging from recent reports include:
The company is considering a strategy that emphasizes console-only access for some of its strongest single-player offerings.
Multiplayer components are expected to continue being available across various platforms.
This approach is designed to provide a compelling reason for users to choose Xbox consoles.
It is even speculated that anticipated projects such as The Elder Scrolls VI—or perhaps a code-named initiative like Project Helix—could eventually be limited to PC and Xbox Series S/X. However, final decisions on these matters have yet to be announced.
Microsoft Shifts Focus with Selective Xbox Exclusives While... This article examines recent developments in Microsoft's approach to game exclusivity on the Xbox platform, focusing on an emerging emphasis on single-player experiences while maintaining cross-platform support for multiplayer features.
Microsoft’s strategy of supporting multiple platforms is still evolving. For instance, Forza Horizon 6 remains accessible Available on personal computers as well as on the Xbox Series S/X despite plans that had been discussed earlier. Recently, during an Xbox Games Showcase, announcements confirmed that certain upcoming titles, For example, titles like Gears of War: E-Day and Clockwork Revolution would be available solely on Xbox. These titles are intended to remain exclusive without any temporary limitations.
This decision has ignited conversations about what lies ahead number of exclusive titles on the Xbox. While the exact count of exclusive games has not yet been detailed, indications show that more titles will follow. Key points emerging from recent reports include:
The company is considering a strategy that emphasizes console-only access for some of its strongest single-player offerings.
Multiplayer components are expected to continue being available across various platforms.
This approach is designed to provide a compelling reason for users to choose Xbox consoles.
It is even speculated that anticipated projects such as The Elder Scrolls VI—or perhaps a code-named initiative like Project Helix—could eventually be limited to PC and Xbox Series S/X. However, final decisions on these matters have yet to be announced.
- Landon White
- 2026-07-09
-
![img]() Japan's Gaming Anniversary: Celebrating Innovation and Globa... The upcoming gaming event in Japan is drawing attention as it marks a milestone anniversary for the renowned show. With excitement echoing from Europe during their own celebrated events, the Japanese celebration promises to be equally monumental, featuring world-famous developers and publishers. The occasion is set to underline the innovation and passion that continues to shape the gaming industry.
The official roster for this event boasts an impressive array of companies. Among those confirmed are:
A well-known developer behind the popular creature series
A leading global gaming console brand
A famous Japanese game developer
A prominent entertainment giant
Several other industry pillars including major names in electronic entertainment
Arranged to take place between the 17th and 21st of September, this year's show will be a hub for numerous announcements and groundbreaking reveals from Japan's gaming community. Consistently featuring distinguished exhibitors and drawing increasing attention every year, the event has become a must-visit for enthusiasts eager to remain updated on the newest trends and innovations in gaming.
Japan's Gaming Anniversary: Celebrating Innovation and Globa... The upcoming gaming event in Japan is drawing attention as it marks a milestone anniversary for the renowned show. With excitement echoing from Europe during their own celebrated events, the Japanese celebration promises to be equally monumental, featuring world-famous developers and publishers. The occasion is set to underline the innovation and passion that continues to shape the gaming industry.
The official roster for this event boasts an impressive array of companies. Among those confirmed are:
A well-known developer behind the popular creature series
A leading global gaming console brand
A famous Japanese game developer
A prominent entertainment giant
Several other industry pillars including major names in electronic entertainment
Arranged to take place between the 17th and 21st of September, this year's show will be a hub for numerous announcements and groundbreaking reveals from Japan's gaming community. Consistently featuring distinguished exhibitors and drawing increasing attention every year, the event has become a must-visit for enthusiasts eager to remain updated on the newest trends and innovations in gaming.
- Landon White
- 2026-07-09
-
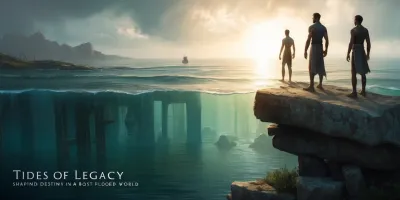
![img]() Tides of Legacy: Shaping Destiny in a Post-Flooded World The immersive experience unfolds as you traverse a world suspended between decay and hope, where the legacy of previous players ripples across time like echoes on water. In this environment, every decision resonates, altering not only your personal journey but also the shared narrative left behind for those who follow. Here, choices are currency, and every act contributes to a continuum of influence that interweaves survival with the remnants of a once-vibrant society. The interplay of past actions and present opportunities invites you to engage with a complex tapestry of human endeavor, environmental decay, and nascent possibility—all while navigating the perils of Here's a unique rephrasing that maintains the original context:
"a realm poised at the threshold of metamorphosis".
Ephemeral Footprints in a Shifting World
The game’s innovative mechanic allows you to witness the consequences of actions taken by previous adventurers, where remnants of their decisions manifest as fleeting apparitions and altered NPC behaviors. Observing a ghost-like replay of past actions enriches the strategic component and challenges you to adapt to circumstances shaped by choices made by others. Each encounter is imbued with a palpable connection to these preceding efforts, prompting you to consider how even seemingly minor actions might ripple forward in unexpected ways. NPCs remember names and align their responses based on legacy deeds—whether to offer assistance or set hurdles in your path. This dynamic interplay blurs the boundaries of individual influence, creating a gameplay experience that is both unpredictable and deeply interactive, as you become acutely aware of the shared narrative weaving through the game’s unfolding landscape.
Dynamic Worldbuilding Amidst Rising Tides
Set in a flooded relic of a civilization, the game’s artistic presentation and narrative framework masterfully captures the struggle for survival and restoration amidst environmental collapse. Structures half-submerged in the encroaching sea, once symbols of human achievement, are now battlegrounds for warring factions with contrasting ideologies. Gang territories emerge as living testimonies to the fractured society, each controlled by groups with distinct motivations: marauding survivors, ambitious reclaimers, and enigmatic mystics. As you navigate this precariously balanced world, every structure and ruin tells a story of lost grandeur and simmering conflict. The art direction conjures a mood of bittersweet reflection—classic tropes reimagined Within a setting that plays a role as integral as any character rather than merely serving as the background—where each soggy alley and waterlogged plaza invites exploration and deep contemplation.
Innovative Interactions with Legacy Players
Among the most mesmerizing components is the game’s approach to inter-player interaction, where your decisions interplay with those of your predecessors. Given a unique glimpse through a special “second sight,” you observe how former players tackled challenges, managed resources, and altered political landscapes. This mechanism challenges traditional single-player constructs by integrating a historical lens into the experience, fostering a sense of continuity and consequence. As you follow the paths charted by others, each new discovery becomes layered with the potential for both honor and regret. The game even tracks moral leanings, categorizing you with descriptors—such as a nature champion or a rebellious outsider—which then open or restrict dialogue trees and choices, ensuring that every play becomes an exploration of character and consequence within an intricately woven communal legacy.
Rich Tapestry of Moral Decisions and Impact
The story develops incrementally, driven by a series of decisions that are meticulously logged and reported, much like episodic chapters in a serialized drama. Every significant decision is captured in a report reminiscent of a post-episode recap, where your actions are summarized with implications for future interactions and challenges. This system not only reinforces the weight of your decisions but also amplifies the emotional stakes of the game. The dialogue and interactions are influenced by your behavioral history; for instance, a reputation for environmental stewardship might unlock unique conversational paths, while a record of rebellious antics could bar certain options. The game’s moral matrix necessitates thoughtful deliberation, offering you a nuanced interface where every ethical choice carries its own set of repercussions, both immediate and far-reaching, ultimately ensuring that the narrative is as complex as it is immersive.
Immersive Puzzle-Solving and Tactical Encounters
Beyond the narrative depth, the game challenges you with puzzles and tactical encounters that require both foresight and quick adaptability. Utilizing the unique vision mechanic, you can glimpse how predecessors navigated these challenges, providing hints or cautionary anecdotes that affect your decision-making process. Whether it is discerning the safest path through charged areas or predicting the rhythm of an adversary’s defensive moves, each encounter is staged as a test of memory and strategy. The ability to observe past maneuvers enriches the gameplay, encouraging inventive problem-solving and sometimes prompting a reversal of strategies to forge novel outcomes. This carefully designed interactivity invites you to experiment, reassess, and ultimately become a participant in a larger story where every challenge is layered with historical breadcrumbs and dynamic tactical opportunities.
Environmental Features that Echo a Dystopic Future
The environment takes on a role as pivotal as any character within the narrative own right, crafted with meticulous attention to details that evoke both nostalgia and impending doom. Set against a backdrop of rising seas and desolate urban sprawls, every scene is engineered to amplify the experience of decay intermingled with hope. The dilapidated remnants of a once-celebrated civilization now serve as arenas for epic conflicts, yet they also provide the canvas upon which stories of resilience are painted. Here, the remnants of modern life coexist with new societal constructs, blending futuristic technology with primal survival instincts. The game’s aesthetic dimensions, filled with muted hues interspersed with vibrant anomalies, serve as constant reminders of nature’s resurgence against human folly. This artistic interplay of elements draws you deeper into a world where every raindrop and broken structure is steeped in lore and potential.
Complex Faction Dynamics and Social Hierarchy
Central to the experience is a multifaceted social structure represented by various factions vying for control against the backdrop of environmental collapse. Characters hailing from diverse backgrounds bring fresh perspectives and conflicting ideologies into the fray, ensuring that alliances formed are always measured and often temporary. Whether it is the fervor of idealistic reclaimers or the seasoned pragmatism of hardened survivors, every encounter is suffused with a palpable tension born of divergent worldviews. The factions not only provide a contextual framework for the narrative but also influence the game mechanics in tangible ways—affecting access to key resources, altering diplomatic interactions, and even shaping combat-like scenarios. Engaging with these groups becomes as much a part of the gameplay as physical survival, resulting in an ever-changing landscape of loyalty, rivalry, and unexpected alliances "that infuse another level of tactical complexity".
Resource Management and Strategic Decision-Making
Integral to the gameplay is the management of scarce resources, a challenge that reinforces the survival aspect of the narrative. In a world where valuable supplies and raw materials are not simply abundant relics of a bygone era, you must carefully cache, trade, or strategically allocate them to both survive and influence the broader game environment. This aspect of resource management is entwined with the legacy mechanics, as the actions taken during one play session directly impact the opportunities available to successors. The game encourages a delicate balance between self-interest and collective welfare, where a decision as simple as purchasing a vital commodity may inadvertently alter the gameplay dynamics for the next player. Such layers of complexity transform every trade and barter into a potential pivot point that could recast the social and ecological fabric of the game world, making strategic foresight as indispensable as combat prowess.
Experiential Metrics and Real-Time Morality Tracking
Enhancing the immersive experience is an innovative metric system that actively tracks your moral and ethical journey throughout the game. This dynamic gauge, represented as a series of measurable indicators, evolves in real time with your decisions and interactions. Whether you lean toward a more altruistic, nature-focused approach or adopt a pragmatic and occasionally rebellious stance, this system influences not only narrative arcs but also the practical aspects of gameplay—unlocking dialogue options, altering interactions, and sometimes even dictating the behavior of NPCs. The impact is immediate and tangible, as the game responds to these metrics with tailored scenarios that reflect your moral positioning. This nuance ensures that each decision is rendered with an added layer of significance, as your virtual persona is continuously reassessed and molded by the interplay of your actions and the ever-watchful eye of the game’s internal ethics engine.
Interplay of Storytelling Through Object-Based Interactions
Another captivating facet of the game is its robust object-interaction system, which transforms mundane tasks into critical narrative moments. Every item, from a decaying ladder to a stockpile of scarce medicine, is imbued with potential consequences that ripple through the storyline. When you choose to repair a structure or stockpile an essential commodity, you are not merely engaging in routine tasks but are actively sculpting the shared legacy for those who follow. This attention to detail bridges the gap between the physical and the narrative, with each tangible interaction serving as a marker of your influence on the world. The design encourages creative and unconventional approaches to solve challenges, ensuring that even the simplest actions are layered with narrative weight—each contributing to the grand, evolving tapestry of interconnected events that define the game’s rich and unpredictable universe.
Tides of Legacy: Shaping Destiny in a Post-Flooded World The immersive experience unfolds as you traverse a world suspended between decay and hope, where the legacy of previous players ripples across time like echoes on water. In this environment, every decision resonates, altering not only your personal journey but also the shared narrative left behind for those who follow. Here, choices are currency, and every act contributes to a continuum of influence that interweaves survival with the remnants of a once-vibrant society. The interplay of past actions and present opportunities invites you to engage with a complex tapestry of human endeavor, environmental decay, and nascent possibility—all while navigating the perils of Here's a unique rephrasing that maintains the original context:
"a realm poised at the threshold of metamorphosis".
Ephemeral Footprints in a Shifting World
The game’s innovative mechanic allows you to witness the consequences of actions taken by previous adventurers, where remnants of their decisions manifest as fleeting apparitions and altered NPC behaviors. Observing a ghost-like replay of past actions enriches the strategic component and challenges you to adapt to circumstances shaped by choices made by others. Each encounter is imbued with a palpable connection to these preceding efforts, prompting you to consider how even seemingly minor actions might ripple forward in unexpected ways. NPCs remember names and align their responses based on legacy deeds—whether to offer assistance or set hurdles in your path. This dynamic interplay blurs the boundaries of individual influence, creating a gameplay experience that is both unpredictable and deeply interactive, as you become acutely aware of the shared narrative weaving through the game’s unfolding landscape.
Dynamic Worldbuilding Amidst Rising Tides
Set in a flooded relic of a civilization, the game’s artistic presentation and narrative framework masterfully captures the struggle for survival and restoration amidst environmental collapse. Structures half-submerged in the encroaching sea, once symbols of human achievement, are now battlegrounds for warring factions with contrasting ideologies. Gang territories emerge as living testimonies to the fractured society, each controlled by groups with distinct motivations: marauding survivors, ambitious reclaimers, and enigmatic mystics. As you navigate this precariously balanced world, every structure and ruin tells a story of lost grandeur and simmering conflict. The art direction conjures a mood of bittersweet reflection—classic tropes reimagined Within a setting that plays a role as integral as any character rather than merely serving as the background—where each soggy alley and waterlogged plaza invites exploration and deep contemplation.
Innovative Interactions with Legacy Players
Among the most mesmerizing components is the game’s approach to inter-player interaction, where your decisions interplay with those of your predecessors. Given a unique glimpse through a special “second sight,” you observe how former players tackled challenges, managed resources, and altered political landscapes. This mechanism challenges traditional single-player constructs by integrating a historical lens into the experience, fostering a sense of continuity and consequence. As you follow the paths charted by others, each new discovery becomes layered with the potential for both honor and regret. The game even tracks moral leanings, categorizing you with descriptors—such as a nature champion or a rebellious outsider—which then open or restrict dialogue trees and choices, ensuring that every play becomes an exploration of character and consequence within an intricately woven communal legacy.
Rich Tapestry of Moral Decisions and Impact
The story develops incrementally, driven by a series of decisions that are meticulously logged and reported, much like episodic chapters in a serialized drama. Every significant decision is captured in a report reminiscent of a post-episode recap, where your actions are summarized with implications for future interactions and challenges. This system not only reinforces the weight of your decisions but also amplifies the emotional stakes of the game. The dialogue and interactions are influenced by your behavioral history; for instance, a reputation for environmental stewardship might unlock unique conversational paths, while a record of rebellious antics could bar certain options. The game’s moral matrix necessitates thoughtful deliberation, offering you a nuanced interface where every ethical choice carries its own set of repercussions, both immediate and far-reaching, ultimately ensuring that the narrative is as complex as it is immersive.
Immersive Puzzle-Solving and Tactical Encounters
Beyond the narrative depth, the game challenges you with puzzles and tactical encounters that require both foresight and quick adaptability. Utilizing the unique vision mechanic, you can glimpse how predecessors navigated these challenges, providing hints or cautionary anecdotes that affect your decision-making process. Whether it is discerning the safest path through charged areas or predicting the rhythm of an adversary’s defensive moves, each encounter is staged as a test of memory and strategy. The ability to observe past maneuvers enriches the gameplay, encouraging inventive problem-solving and sometimes prompting a reversal of strategies to forge novel outcomes. This carefully designed interactivity invites you to experiment, reassess, and ultimately become a participant in a larger story where every challenge is layered with historical breadcrumbs and dynamic tactical opportunities.
Environmental Features that Echo a Dystopic Future
The environment takes on a role as pivotal as any character within the narrative own right, crafted with meticulous attention to details that evoke both nostalgia and impending doom. Set against a backdrop of rising seas and desolate urban sprawls, every scene is engineered to amplify the experience of decay intermingled with hope. The dilapidated remnants of a once-celebrated civilization now serve as arenas for epic conflicts, yet they also provide the canvas upon which stories of resilience are painted. Here, the remnants of modern life coexist with new societal constructs, blending futuristic technology with primal survival instincts. The game’s aesthetic dimensions, filled with muted hues interspersed with vibrant anomalies, serve as constant reminders of nature’s resurgence against human folly. This artistic interplay of elements draws you deeper into a world where every raindrop and broken structure is steeped in lore and potential.
Complex Faction Dynamics and Social Hierarchy
Central to the experience is a multifaceted social structure represented by various factions vying for control against the backdrop of environmental collapse. Characters hailing from diverse backgrounds bring fresh perspectives and conflicting ideologies into the fray, ensuring that alliances formed are always measured and often temporary. Whether it is the fervor of idealistic reclaimers or the seasoned pragmatism of hardened survivors, every encounter is suffused with a palpable tension born of divergent worldviews. The factions not only provide a contextual framework for the narrative but also influence the game mechanics in tangible ways—affecting access to key resources, altering diplomatic interactions, and even shaping combat-like scenarios. Engaging with these groups becomes as much a part of the gameplay as physical survival, resulting in an ever-changing landscape of loyalty, rivalry, and unexpected alliances "that infuse another level of tactical complexity".
Resource Management and Strategic Decision-Making
Integral to the gameplay is the management of scarce resources, a challenge that reinforces the survival aspect of the narrative. In a world where valuable supplies and raw materials are not simply abundant relics of a bygone era, you must carefully cache, trade, or strategically allocate them to both survive and influence the broader game environment. This aspect of resource management is entwined with the legacy mechanics, as the actions taken during one play session directly impact the opportunities available to successors. The game encourages a delicate balance between self-interest and collective welfare, where a decision as simple as purchasing a vital commodity may inadvertently alter the gameplay dynamics for the next player. Such layers of complexity transform every trade and barter into a potential pivot point that could recast the social and ecological fabric of the game world, making strategic foresight as indispensable as combat prowess.
Experiential Metrics and Real-Time Morality Tracking
Enhancing the immersive experience is an innovative metric system that actively tracks your moral and ethical journey throughout the game. This dynamic gauge, represented as a series of measurable indicators, evolves in real time with your decisions and interactions. Whether you lean toward a more altruistic, nature-focused approach or adopt a pragmatic and occasionally rebellious stance, this system influences not only narrative arcs but also the practical aspects of gameplay—unlocking dialogue options, altering interactions, and sometimes even dictating the behavior of NPCs. The impact is immediate and tangible, as the game responds to these metrics with tailored scenarios that reflect your moral positioning. This nuance ensures that each decision is rendered with an added layer of significance, as your virtual persona is continuously reassessed and molded by the interplay of your actions and the ever-watchful eye of the game’s internal ethics engine.
Interplay of Storytelling Through Object-Based Interactions
Another captivating facet of the game is its robust object-interaction system, which transforms mundane tasks into critical narrative moments. Every item, from a decaying ladder to a stockpile of scarce medicine, is imbued with potential consequences that ripple through the storyline. When you choose to repair a structure or stockpile an essential commodity, you are not merely engaging in routine tasks but are actively sculpting the shared legacy for those who follow. This attention to detail bridges the gap between the physical and the narrative, with each tangible interaction serving as a marker of your influence on the world. The design encourages creative and unconventional approaches to solve challenges, ensuring that even the simplest actions are layered with narrative weight—each contributing to the grand, evolving tapestry of interconnected events that define the game’s rich and unpredictable universe.
- Grace Lee
- 2026-06-23
-
![img]() South American Shockwave: A Historic Triumph in London Valor... This past weekend offered an exciting display of high-caliber gameplay during a major Valorant tournament in London. One of several key esports showdowns, this premier event brought together 12 top teams Drawing talent from every corner of the world in pursuit of a grand prize of one million dollars, all while fans enjoyed unexpected twists both on and off the main stage.
In a stunning display of skill and resolve, the South American team emerged as the surprise victor of the competition. Overcoming a tough contest against a formidable opponent in a closely-fought 3-2 final, the team secured Not solely the championship crown but also a prize reward of $350,000. This win now places them at the forefront as they prepare to face heightened competition in upcoming regional stages and the ultimate Champions tournament.
The achievement represents the team’s most significant win in Valorant to date. Although they previously captured a regional title, this triumph in the London event marks a milestone, elevating their status in a highly competitive scene where every match counts.
How will the team build on this major success?
What strategies will they adopt as they move into further stages of play?
Can this momentum lead to a string of dominant performances in future tournaments?
South American Shockwave: A Historic Triumph in London Valor... This past weekend offered an exciting display of high-caliber gameplay during a major Valorant tournament in London. One of several key esports showdowns, this premier event brought together 12 top teams Drawing talent from every corner of the world in pursuit of a grand prize of one million dollars, all while fans enjoyed unexpected twists both on and off the main stage.
In a stunning display of skill and resolve, the South American team emerged as the surprise victor of the competition. Overcoming a tough contest against a formidable opponent in a closely-fought 3-2 final, the team secured Not solely the championship crown but also a prize reward of $350,000. This win now places them at the forefront as they prepare to face heightened competition in upcoming regional stages and the ultimate Champions tournament.
The achievement represents the team’s most significant win in Valorant to date. Although they previously captured a regional title, this triumph in the London event marks a milestone, elevating their status in a highly competitive scene where every match counts.
How will the team build on this major success?
What strategies will they adopt as they move into further stages of play?
Can this momentum lead to a string of dominant performances in future tournaments?
- Grace Lee
- 2026-06-23
-
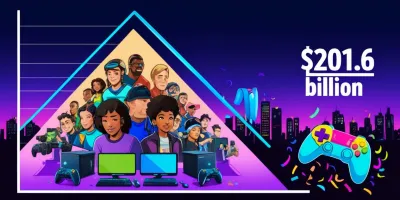
![img]() Gaming Industry Defies Uncertainty with Record $201.6 Billio... The gaming arena is currently navigating through a phase marked by reductions in workforce and a sense of unpredictability, yet it has also recorded a remarkable financial milestone that has caught the attention of industry observers and enthusiasts alike.
The current environment has left many professionals feeling unsure about the future of their work, even Yet the data reveals an entirely different picture. For those who are captivated by impressive revenue figures, the past year has been momentous as the industry reached a revenue total exceeding 200 billion dollars for the first time.
A recent analysis revealed a 9% growth in global gaming revenue compared to the previous year, culminating in an annual total of 201.6 billion dollars. This performance not only exceeded expectations but also overcame the challenges posed by modest growth in the console segment and a debut for Nintendo's latest console that did not meet initial predictions.
The boost in overall revenue can largely be credited to a significant surge in PC gaming, which experienced a 12% increase during the same period. Several factors contributed to this impressive growth, including:
The release of high-profile, large-scale titles
Strong showings from mid-tier games that resonated well on the PC platform
A considerable amount of revenue generated through in-game purchases
While console revenues still managed to outpace PC earnings, their progression was noticeably more gradual. Expectations for 2026 suggest that the current pace of PC growth may ease; however, the upcoming launch Featuring top-tier franchises like Grand Theft Auto VI, along with a slew of significant releases in the final months of the year, indicate that the industry is set to continue its robust performance.
Gaming Industry Defies Uncertainty with Record $201.6 Billio... The gaming arena is currently navigating through a phase marked by reductions in workforce and a sense of unpredictability, yet it has also recorded a remarkable financial milestone that has caught the attention of industry observers and enthusiasts alike.
The current environment has left many professionals feeling unsure about the future of their work, even Yet the data reveals an entirely different picture. For those who are captivated by impressive revenue figures, the past year has been momentous as the industry reached a revenue total exceeding 200 billion dollars for the first time.
A recent analysis revealed a 9% growth in global gaming revenue compared to the previous year, culminating in an annual total of 201.6 billion dollars. This performance not only exceeded expectations but also overcame the challenges posed by modest growth in the console segment and a debut for Nintendo's latest console that did not meet initial predictions.
The boost in overall revenue can largely be credited to a significant surge in PC gaming, which experienced a 12% increase during the same period. Several factors contributed to this impressive growth, including:
The release of high-profile, large-scale titles
Strong showings from mid-tier games that resonated well on the PC platform
A considerable amount of revenue generated through in-game purchases
While console revenues still managed to outpace PC earnings, their progression was noticeably more gradual. Expectations for 2026 suggest that the current pace of PC growth may ease; however, the upcoming launch Featuring top-tier franchises like Grand Theft Auto VI, along with a slew of significant releases in the final months of the year, indicate that the industry is set to continue its robust performance.
- Landon White
- 2026-06-23
-
![img]() Seaside Enigmas: A Journey from Broken Communicators to Glob... In the vibrant ecosystem of Animal Crossing: New Horizons, unexpected encounters and hidden quests form the heartbeat of island life. A subtle yet compelling narrative unfolds as players interact with eccentric visitors whose needs quickly become entwined with the challenges of everyday island living. The gentle interplay between exploration, discovery, and community builds a rich tapestry that invites both careful observation and spontaneous adventure. Among the myriad activities and interactions that define this universe, one stranded visitor in particular sparks a scavenger hunt that intertwines mystery and reward, offering players the opportunity to restore broken communication and unearth rare treasures with global flair.
Maritime Mystery in a Vibrant World
Animal Crossing: New Horizons continually beckons players with unexpected visits from peculiar characters who enrich the island experience. One such figure is a stranded traveler whose mysterious plight sets the stage for an engaging scavenger quest. As the island basks in colorful sunlight and gentle coastal breezes, this guest’s presence adds a meaningful twist to routine island activities. Rather than trading common commodities, his predicament calls for careful exploration along the grains of sand and tides of the shore. The quest is designed with subtle complexity, challenging players to step outside ordinary tasks while blending the enchanting world of nature with a narrative steeped in mystery. Each step taken along the beach deepens the sense that every discovery matters in building this ever-evolving digital haven.
Encounters Beyond the Ordinary
The island’s magic is amplified by encounters that defy everyday expectations. On a seemingly ordinary day, the arrival of a disoriented traveler injects a burst of intrigue into the serene landscape. His presence is not marked by commerce or trivial dialogue; instead, it signals a call for assistance that transforms the exploration of the beach into an engrossing mission. As players meander along the sandy coast, the gentle murmur of the ocean becomes a backdrop for a mystery in need of unraveling. Interacting with this castaway invites players to engage with a layered narrative where every inquisitive step—each well-timed conversation—unfolds a new facet of the island’s charm, enriching the experience with the thrill of hidden quests and unexpected challenges.
Crafting a Quest With Hidden Treasures
The stranded traveler's unusual request for help encapsulates the essence of problem-solving within the playful confines of the island. Tasked with recovering five discreet fragments to mend his broken communicator, players embark on a journey that fuses exploration with discovery. These fragments, subtle yet essential, are concealed around small water-spraying holes nestled in the sand—areas typically known for yielding manila clams used in fishing bait recipes. Accepting this challenge redefines the purpose of exploring familiar coastal nooks, as each detected shimmer beneath the surface could reveal the crucial pieces needed to restore communication. In this way, the familiar act of resource gathering is elevated into an artful quest that challenges players to balance routine activities with moments of adventurous inquiry.
The Art and Tactile Joy of Digging
One of the game’s most endearing features is how it transforms apparent simplicity into a nuanced interactive experience. Once players agree to assist the stranded visitor, the standard activity of beach exploration evolves into a delicate exercise involving precise movement and careful digging. With a trusty shovel in hand, the act becomes an art form—each swing a delicate negotiation between discovery and routine pastime. Hidden beneath the soft sand, tiny water-spraying holes mark the secret spot where a communicator part might be buried. This process not only intensifies the tactile joy of exploring a beach landscape but also weaves a richer narrative into the overall gameplay. Every dig and every unexpected burst of water serves as a reminder that the most unassuming settings can harbor secrets waiting to be unveiled.
Diverging Paths: Unique Methods and Alternatives
Delving deeper into the island’s multifaceted systems reveals a dual approach to resource acquisition that invites players to think strategically. The stranded traveler offers more than a straightforward quest; the choice between immediate gratification and long-term rewards presents a compelling dilemma. The basic method requires players to search the beach for the communicator parts, which upon collection, bring direct rewards in return. Alternatively, those with a penchant for delay and planning might opt to withhold these pieces, allowing them to transform into a rare resource the next day. This layered decision-making process enriches the gameplay, intertwining resource management with a strategic twist. By weighing immediate benefits against the potential of accumulating rarer components, players engage in a balancing act that underscores the game’s depth and versatility.
Resource Transformation and Its Intricacies
The design of Animal Crossing: New Horizons shines in its ability to offer multiple pathways towards achievement. A notable example is the transformation process whereby ordinary communicator parts evolve into more elusive, rusted pieces. This metamorphosis depends on the choices made during a visitor’s appearance. When players choose to retain the freshly unearthed fragments instead of delivering them immediately, they set in motion a process that converts these items overnight into a coveted form. Although this means relinquishing the coach’s immediate reward, the end result is An indispensable asset that plays a pivotal role in crafting exclusive items. Such intricate mechanics underscore the importance of strategic foresight, encouraging islanders to experiment with different approaches in order to fully harness the game’s rich interplay of resources, rewards, and hidden opportunities.
Crafting Triumphs and the Path of Creation
The creative spirit of Animal Crossing: New Horizons is further enriched by its robust crafting system, where rare materials lead to the creation of exclusive, unique items. A prime example emerges in the form of a remarkable furniture piece inspired by futuristic and mechanical aesthetics. To craft this standout piece, players must utilize the rusted components that result from the alternative method of collecting communicator parts. The process begins at Resident Services, where the recipe for such a mechanical marvel becomes available after a certain level of development. Players invest in the acquisition of design blueprints using in-game currency, and then merge their resource strategy with creative ambition to build an item that is both visually impressive and functionally innovative. This blend of technical strategy and artistic expression not only motivates resource collection but also cements a personal connection with the island’s evolving style.
Island Furnishings: A Global Cultural Cornerstone
What sets the rewards of this quest apart is the way they capture the essence of global cultures and artistic traditions. As a token of gratitude, the stranded visitor bestows items that carry hints of far-off lands and historical landmarks. From statues reminiscent of majestic ancient sculptures to headwear influenced by diverse cultural styles, each piece brings a slice of the world to the player’s personal island. This eclectic mix is designed to excite collectors and aficionados alike, offering them the chance to create thematic displays that echo international heritage. The furnishing items do not merely fill a decorative role; they serve as conversation pieces that narrate tales of faraway civilizations.
Seaside Enigmas: A Journey from Broken Communicators to Glob... In the vibrant ecosystem of Animal Crossing: New Horizons, unexpected encounters and hidden quests form the heartbeat of island life. A subtle yet compelling narrative unfolds as players interact with eccentric visitors whose needs quickly become entwined with the challenges of everyday island living. The gentle interplay between exploration, discovery, and community builds a rich tapestry that invites both careful observation and spontaneous adventure. Among the myriad activities and interactions that define this universe, one stranded visitor in particular sparks a scavenger hunt that intertwines mystery and reward, offering players the opportunity to restore broken communication and unearth rare treasures with global flair.
Maritime Mystery in a Vibrant World
Animal Crossing: New Horizons continually beckons players with unexpected visits from peculiar characters who enrich the island experience. One such figure is a stranded traveler whose mysterious plight sets the stage for an engaging scavenger quest. As the island basks in colorful sunlight and gentle coastal breezes, this guest’s presence adds a meaningful twist to routine island activities. Rather than trading common commodities, his predicament calls for careful exploration along the grains of sand and tides of the shore. The quest is designed with subtle complexity, challenging players to step outside ordinary tasks while blending the enchanting world of nature with a narrative steeped in mystery. Each step taken along the beach deepens the sense that every discovery matters in building this ever-evolving digital haven.
Encounters Beyond the Ordinary
The island’s magic is amplified by encounters that defy everyday expectations. On a seemingly ordinary day, the arrival of a disoriented traveler injects a burst of intrigue into the serene landscape. His presence is not marked by commerce or trivial dialogue; instead, it signals a call for assistance that transforms the exploration of the beach into an engrossing mission. As players meander along the sandy coast, the gentle murmur of the ocean becomes a backdrop for a mystery in need of unraveling. Interacting with this castaway invites players to engage with a layered narrative where every inquisitive step—each well-timed conversation—unfolds a new facet of the island’s charm, enriching the experience with the thrill of hidden quests and unexpected challenges.
Crafting a Quest With Hidden Treasures
The stranded traveler's unusual request for help encapsulates the essence of problem-solving within the playful confines of the island. Tasked with recovering five discreet fragments to mend his broken communicator, players embark on a journey that fuses exploration with discovery. These fragments, subtle yet essential, are concealed around small water-spraying holes nestled in the sand—areas typically known for yielding manila clams used in fishing bait recipes. Accepting this challenge redefines the purpose of exploring familiar coastal nooks, as each detected shimmer beneath the surface could reveal the crucial pieces needed to restore communication. In this way, the familiar act of resource gathering is elevated into an artful quest that challenges players to balance routine activities with moments of adventurous inquiry.
The Art and Tactile Joy of Digging
One of the game’s most endearing features is how it transforms apparent simplicity into a nuanced interactive experience. Once players agree to assist the stranded visitor, the standard activity of beach exploration evolves into a delicate exercise involving precise movement and careful digging. With a trusty shovel in hand, the act becomes an art form—each swing a delicate negotiation between discovery and routine pastime. Hidden beneath the soft sand, tiny water-spraying holes mark the secret spot where a communicator part might be buried. This process not only intensifies the tactile joy of exploring a beach landscape but also weaves a richer narrative into the overall gameplay. Every dig and every unexpected burst of water serves as a reminder that the most unassuming settings can harbor secrets waiting to be unveiled.
Diverging Paths: Unique Methods and Alternatives
Delving deeper into the island’s multifaceted systems reveals a dual approach to resource acquisition that invites players to think strategically. The stranded traveler offers more than a straightforward quest; the choice between immediate gratification and long-term rewards presents a compelling dilemma. The basic method requires players to search the beach for the communicator parts, which upon collection, bring direct rewards in return. Alternatively, those with a penchant for delay and planning might opt to withhold these pieces, allowing them to transform into a rare resource the next day. This layered decision-making process enriches the gameplay, intertwining resource management with a strategic twist. By weighing immediate benefits against the potential of accumulating rarer components, players engage in a balancing act that underscores the game’s depth and versatility.
Resource Transformation and Its Intricacies
The design of Animal Crossing: New Horizons shines in its ability to offer multiple pathways towards achievement. A notable example is the transformation process whereby ordinary communicator parts evolve into more elusive, rusted pieces. This metamorphosis depends on the choices made during a visitor’s appearance. When players choose to retain the freshly unearthed fragments instead of delivering them immediately, they set in motion a process that converts these items overnight into a coveted form. Although this means relinquishing the coach’s immediate reward, the end result is An indispensable asset that plays a pivotal role in crafting exclusive items. Such intricate mechanics underscore the importance of strategic foresight, encouraging islanders to experiment with different approaches in order to fully harness the game’s rich interplay of resources, rewards, and hidden opportunities.
Crafting Triumphs and the Path of Creation
The creative spirit of Animal Crossing: New Horizons is further enriched by its robust crafting system, where rare materials lead to the creation of exclusive, unique items. A prime example emerges in the form of a remarkable furniture piece inspired by futuristic and mechanical aesthetics. To craft this standout piece, players must utilize the rusted components that result from the alternative method of collecting communicator parts. The process begins at Resident Services, where the recipe for such a mechanical marvel becomes available after a certain level of development. Players invest in the acquisition of design blueprints using in-game currency, and then merge their resource strategy with creative ambition to build an item that is both visually impressive and functionally innovative. This blend of technical strategy and artistic expression not only motivates resource collection but also cements a personal connection with the island’s evolving style.
Island Furnishings: A Global Cultural Cornerstone
What sets the rewards of this quest apart is the way they capture the essence of global cultures and artistic traditions. As a token of gratitude, the stranded visitor bestows items that carry hints of far-off lands and historical landmarks. From statues reminiscent of majestic ancient sculptures to headwear influenced by diverse cultural styles, each piece brings a slice of the world to the player’s personal island. This eclectic mix is designed to excite collectors and aficionados alike, offering them the chance to create thematic displays that echo international heritage. The furnishing items do not merely fill a decorative role; they serve as conversation pieces that narrate tales of faraway civilizations.
- Grace Lee
- 2026-06-09
-
![img]() Electrifying Finale: G2 Esports Edges Out Karmine Corp in a... This season in the competitive gaming world has delivered extraordinary moments, with electrifying tournaments and unexpected twists keeping fans on the edge of their seats.
The past weekend was packed with high-profile showcases and dynamic matches, one of the highlights being the Spring edition of the League of Legends EMEA Championship. In a process where just three teams were left standing, every match played a key role in determining the ultimate victor.
At the onset of postseason competition, the Lower Bracket Final unfolded with Karmine Corp outpacing Movistar KOI, thrashing their opponents in a decisive 3-0 performance. Notably, this outcome set the stage for a consequential rematch, given that G2 Esports had previously sent Karmine Corp into the elimination rounds earlier in the season.
During the final showdown, even though Karmine Corp put forth a solid effort, G2 Esports narrowly clinched a 3-2 win. This victory not only adds another prestigious trophy to the German team's collection but also secures their participation Competing not only at the Mid-Season Invitational but also in the
This rephrasing maintains the original context while offering a unique formulation Esports World Cup later this summer. Meanwhile, Karmine Corp, by virtue of reaching the final, will be the LEC representative at MSI 2026. Does this outcome come as a surprise?
Event Highlights:
Thrilling playoff action with only three teams remaining.
Karmine Corp overcoming their opponent in the Lower Bracket Final.
G2 Esports reclaiming dominance through a hard-fought 3-2 final win.
Securing spots Present not only at the Mid-Season Invitational but also at the
This variation keeps the original meaning intact while ensuring the phrasing is entirely unique Esports World Cup.
Karmine Corp earning their place as the LEC representative at MSI 2026.
Electrifying Finale: G2 Esports Edges Out Karmine Corp in a... This season in the competitive gaming world has delivered extraordinary moments, with electrifying tournaments and unexpected twists keeping fans on the edge of their seats.
The past weekend was packed with high-profile showcases and dynamic matches, one of the highlights being the Spring edition of the League of Legends EMEA Championship. In a process where just three teams were left standing, every match played a key role in determining the ultimate victor.
At the onset of postseason competition, the Lower Bracket Final unfolded with Karmine Corp outpacing Movistar KOI, thrashing their opponents in a decisive 3-0 performance. Notably, this outcome set the stage for a consequential rematch, given that G2 Esports had previously sent Karmine Corp into the elimination rounds earlier in the season.
During the final showdown, even though Karmine Corp put forth a solid effort, G2 Esports narrowly clinched a 3-2 win. This victory not only adds another prestigious trophy to the German team's collection but also secures their participation Competing not only at the Mid-Season Invitational but also in the
This rephrasing maintains the original context while offering a unique formulation Esports World Cup later this summer. Meanwhile, Karmine Corp, by virtue of reaching the final, will be the LEC representative at MSI 2026. Does this outcome come as a surprise?
Event Highlights:
Thrilling playoff action with only three teams remaining.
Karmine Corp overcoming their opponent in the Lower Bracket Final.
G2 Esports reclaiming dominance through a hard-fought 3-2 final win.
Securing spots Present not only at the Mid-Season Invitational but also at the
This variation keeps the original meaning intact while ensuring the phrasing is entirely unique Esports World Cup.
Karmine Corp earning their place as the LEC representative at MSI 2026.
- Landon White
- 2026-06-09
-
![img]() Into the Wind: Soaring Through Sunlit Mysteries and Family S... This article introduces a welcoming new adventure from a Swedish indie team, showcasing a project that channels the warmth and charm of a renowned animation studio. The game offers an immersive experience set in a sunlit, Mediterranean-inspired world where exploration, mystery, and community connection take center stage.
During a recent PC Gaming Show, the developer presented its upcoming title, Into the Wind. This game invites players to navigate the picturesque Adriatic Islands of Santa Rosa while managing a delivery service inherited from a beloved uncle. The journey intertwines aspects of exploration with the practical elements of running a business.
At the heart of the adventure, players are drawn into a narrative about uncovering the truth behind a family member's unexplained disappearance. The experience involves meeting a variety of vibrant island characters, personalizing both vehicles and living spaces, contending with mischievous air pirates, and ultimately embracing the thrill of soaring through the skies as part of an unforgettable voyage.
The gameplay introduces thoughtful delivery mechanics, where the weight of parcels, fuel considerations, and environmental factors like weather, wind, and terrain all play significant roles. A standout feature is a flying motorcycle that eases travel across the layered and diverse islands, even when handling tricky deliveries.
Insights from the project’s creative lead reveal a genuine admiration for inspirational animations and films that honor the essence of unbridled freedom and daring exploration. He described the game as a heartfelt tribute to cherished memories, from animated classics and gaming experiences to cool summer evenings bathed in golden light. The adventure is designed to capture both the excitement of swift movement and the simple pleasures found in everyday moments.
Additional details include:
The title will be available on PC through a popular digital platform.
It is set to debut as an Early Access release project.
Early promotional material, including a trailer and screenshots, is already being shared.
Fans of narrative-driven explorations and inventive gameplay mechanics can look forward to taking flight across the charming skies of Santa Rosa as they uncover the secrets left behind by family and fate.
Into the Wind: Soaring Through Sunlit Mysteries and Family S... This article introduces a welcoming new adventure from a Swedish indie team, showcasing a project that channels the warmth and charm of a renowned animation studio. The game offers an immersive experience set in a sunlit, Mediterranean-inspired world where exploration, mystery, and community connection take center stage.
During a recent PC Gaming Show, the developer presented its upcoming title, Into the Wind. This game invites players to navigate the picturesque Adriatic Islands of Santa Rosa while managing a delivery service inherited from a beloved uncle. The journey intertwines aspects of exploration with the practical elements of running a business.
At the heart of the adventure, players are drawn into a narrative about uncovering the truth behind a family member's unexplained disappearance. The experience involves meeting a variety of vibrant island characters, personalizing both vehicles and living spaces, contending with mischievous air pirates, and ultimately embracing the thrill of soaring through the skies as part of an unforgettable voyage.
The gameplay introduces thoughtful delivery mechanics, where the weight of parcels, fuel considerations, and environmental factors like weather, wind, and terrain all play significant roles. A standout feature is a flying motorcycle that eases travel across the layered and diverse islands, even when handling tricky deliveries.
Insights from the project’s creative lead reveal a genuine admiration for inspirational animations and films that honor the essence of unbridled freedom and daring exploration. He described the game as a heartfelt tribute to cherished memories, from animated classics and gaming experiences to cool summer evenings bathed in golden light. The adventure is designed to capture both the excitement of swift movement and the simple pleasures found in everyday moments.
Additional details include:
The title will be available on PC through a popular digital platform.
It is set to debut as an Early Access release project.
Early promotional material, including a trailer and screenshots, is already being shared.
Fans of narrative-driven explorations and inventive gameplay mechanics can look forward to taking flight across the charming skies of Santa Rosa as they uncover the secrets left behind by family and fate.
- Grace Lee
- 2026-06-09